Common questions
- Pioreactor operation
- How can I restart my Pioreactor? Is pulling the power plug out safe?
- Can I still use the Pioreactor software without the hardware?
- Why does the onboard blue LED keep flashing?
- What does the onboard button do?
- How do I change the date or time on the Pioreactor?
- The UI says "Unknown Pioreactor model: name and version not set yet" or the model dialog never appeared. What do I do?
- What are the measurements of the vials?
- Optical density and LEDs
- How does optical density work on the Pioreactor?
- What are the units of Pioreactor's optical density
- How can I change the frequency (rate) of optical density measurements?
- Why does the intensity for LED A turn on & off during an experiment?
- Why does my optical density flatten, or even decrease? What is a saturation point?
- What does the effect of the scatter angle have on optical density?
- Can I use my own 5mm LEDs and photodiodes for optical density?
- Is optical density the same as turbidity?
- Heating and Temperature control
- Mixing and stirring in the Pioreactor
- How is mixing / stirring performed in the Pioreactor?
- Can I use my own stir bar?
- Why does the stir bar stop or wobble when OD dodging changes RPM?
- The magnets rub against the plastic screws above them, causing the stirring performance to be degraded / stop. How do I fix this?
- How can I increase the strength of the magnetic force applied to the stirbar?
- How can I improve mixing and aeration?
- Can I plot the RPM in a chart in the UI?
- Raspberry Pi Hardware
- What Raspberry Pi hardware can I use? I see Raspberry Pi 1, 2, 3, 4, 5, A, B, +, Zero - it's confusing!
- What microSD cards do you recommend?
- Raspberry Pi Imager fails while writing the image. What should I do?
- What power supply unit (PSU) do I need?
- Do I need any cooling for the Raspberry Pi?
- Could a Raspberry Pi-compatible board work, like Rock Pi 4?
- What is the username/password for the Raspberry Pi?
- Can I use the desktop interface (with a display) with the Pioreactor?
- Dosing
- Data storage, access and recovery
- Networking
- How do I change/edit the network the Pioreactor on?
- Can I use Ethernet cable connections instead of Wifi connections?
- How can I determine the Pioreactor's IP address? Or the MAC address?
- I'm using a local access point, but I'd like to install plugins, update software, etc.
- If I have multiple Pioreactor leaders on my network, what leader does
http://pioreactor.localpoint to?
Pioreactor operation
How can I restart my Pioreactor? Is pulling the power plug out safe?
We suggest using the UI to reboot a Pioreactor:
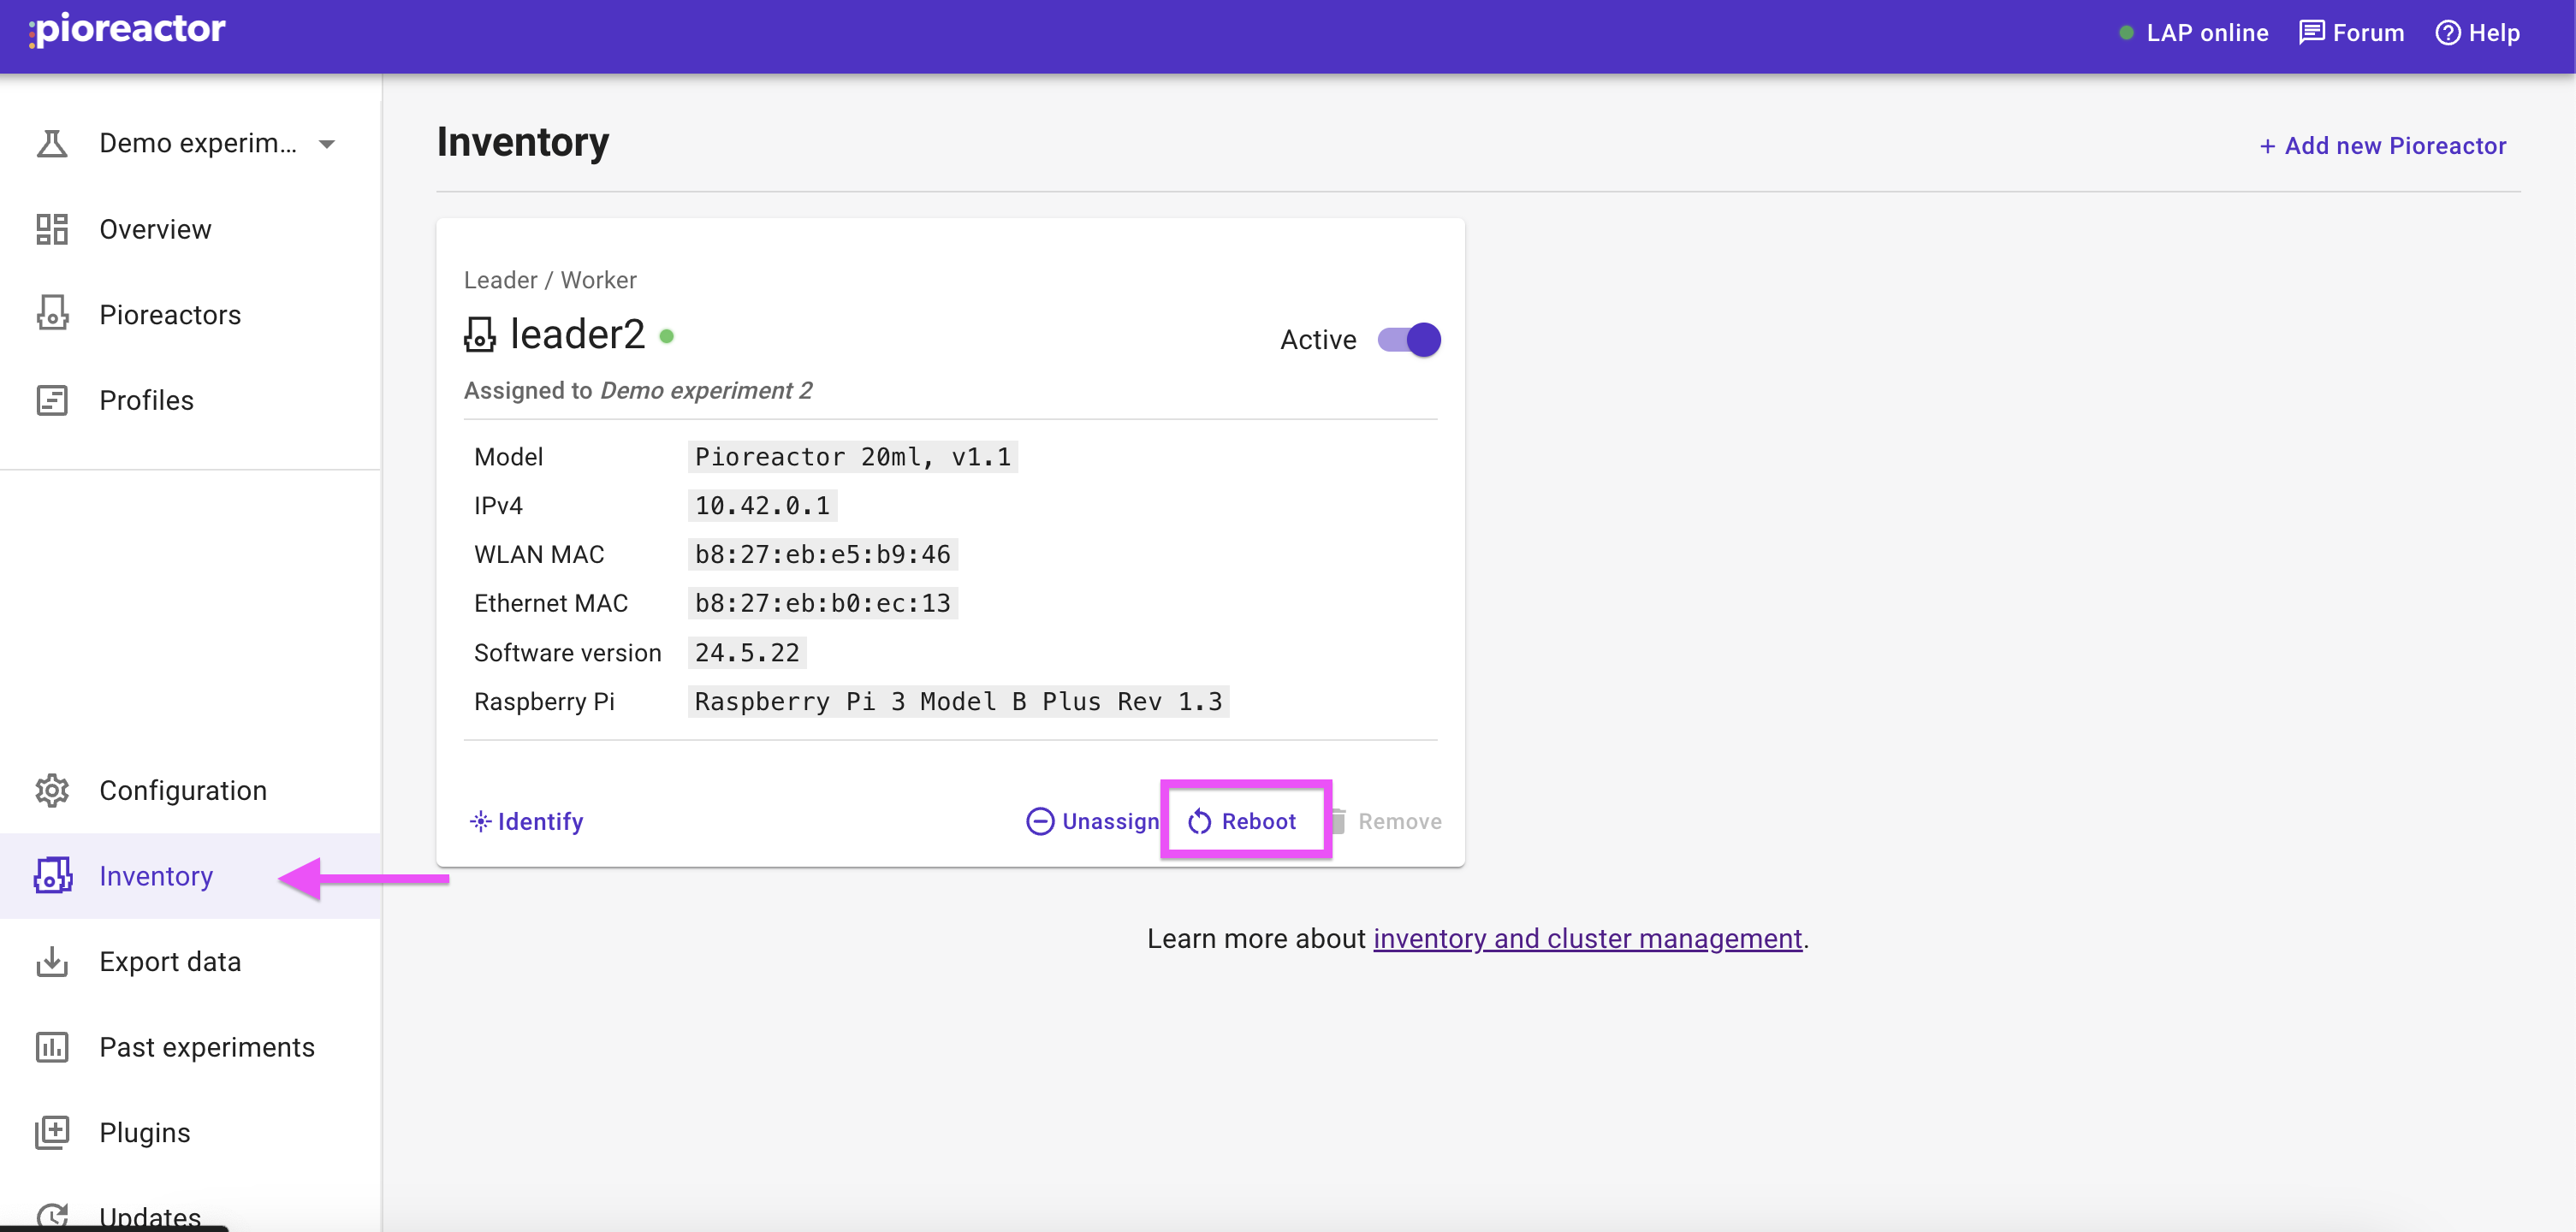
Pulling the plug is usually fine, but try to avoid doing it as it does risk data corruption.
Can I still use the Pioreactor software without the hardware?
Yes - the Pioreactor UI and software will still work. We provide a "leader-only" image that is designed to only host a cluster, and not be an active worker. The leader-only image, pioreactor_leader.zip , are available here.
Why does the onboard blue LED keep flashing?
There may be a problem. You can diagnose the problem by counting the number of flashes observed.
What does the onboard button do?
The button on the Pioreactor HAT sends a signal to the web UI to display a "hello" message. This is useful to know which Pioreactor in a cluster you are interacting with.
The button can be reprogrammed, too.
How do I change the date or time on the Pioreactor?
Under Inventory -> Manage inventory -> Sync clocks. You can change the date and time there.
The UI says "Unknown Pioreactor model: name and version not set yet" or the model dialog never appeared. What do I do?
Go to the Inventory page and use the Model dropdown on the Pioreactor card to set the correct model and hardware version (the dropdown can be hidden on narrow cards). Save the change and reboot the Pioreactor from the Inventory page. This should clear the error and let the UI load normally.
What are the measurements of the vials?
| 40ml vials | Bottom OD | Middle OD | Bottom to Neck Height | Neck Height | Total Height |
|---|---|---|---|---|---|
| Average | 27.50 mm | 27.53 mm | 81.52 mm | 13.18 mm | 94.70 mm |
| Standard Deviation | 0.03 mm | 0.03 mm | 0.33 mm | 0.35 mm | 0.36 mm |
| 2 percentile | 27.44 mm | 27.48 mm | 80.82 mm | 12.41 mm | 93.85 mm |
| 5 percentile | 27.45 mm | 27.48 mm | 80.97 mm | 12.92 mm | 94.04 mm |
| 95 percentile | 27.55 mm | 27.57 mm | 81.85 mm | 13.56 mm | 95.13 mm |
| 98 percentile | 27.55 mm | 27.58 mm | 81.91 mm | 13.64 mm | 95.18 mm |
| 20ml vials | Bottom OD | Middle OD | Bottom to Neck Height | Neck Height | Total Height |
|---|---|---|---|---|---|
| Average | 27.48 mm | 27.51 mm | 45.08 mm | 12.32 mm | 57.40 mm |
| Standard Deviation | 0.04 mm | 0.05 mm | 0.31 mm | 0.15 mm | 0.28 mm |
| 2 percentile | 27.41 mm | 27.44 mm | 44.60 mm | 12.07 mm | 56.86 mm |
| 5 percentile | 27.42 mm | 27.45 mm | 44.64 mm | 12.09 mm | 56.97 mm |
| 95 percentile | 27.52 mm | 27.58 mm | 45.50 mm | 12.54 mm | 57.83 mm |
| 98 percentile | 27.54 mm | 27.59 mm | 45.54 mm | 12.60 mm | 57.91 mm |
Glass thickness: 1.05 to 1.15 mm
Optical density and LEDs
How does optical density work on the Pioreactor?
The Pioreactor uses turbidity to measure optical density (other systems, like spectrophotometers, use attenuation). Specifically, the Pioreactor uses scattering of light. The system will shine infrared light into the culture, and measure the amount of light that is scattered off cells. The scattering has a good linear range (see below for more), and higher saturation point than attenuation for cultures of 20ml volume. If you have an instrument that measures OD600 or some other measurement of optical density, and you wish to calibrate to that, the Pioreactor has a routine to perform a calibration and record in the instruments units. See docs here.
What are the units of Pioreactor's optical density
The uncalibrated optical densities reported the UI and recorded in the database are have an arbitrary unit, and are per Pioreactor (so they can't be compared to each other). However, the normalized optical density, generated after starting the activity Growth rate in the UI, is comparable, which is why we suggest using it for inferences (especially if you haven't calibrated to some OD600 machine). Read more about our optical density measurements here.
How can I change the frequency (rate) of optical density measurements?
In the configuration, you can edit the parameter samples_per_second to adjust the how often the Pioreactor takes an optical density snapshot. Note that this parameter is the inverse of "duration between readings". For example, if you wish to record a measurement every 60 seconds, then samples_per_second=0.01666667 (which is 1/60).
Why does the intensity for LED A turn on & off during an experiment?
You may have noticed that the LED labelled A turns on & off every 5 seconds or so. This is (normally) the channel for the infrared (IR) LED, which is used in the optical density measurements. We only take reading every 5 seconds (the default), we don't need the IR LED on all the time. The Pioreactor will only turn on LED when needed. This preserves the strength of the LED over longer periods of time. For more advanced use cases, it also allows other optical measurements to take place without the IR LED interfering with them.
Why does my optical density flatten, or even decrease? What is a saturation point?
For some experiments, especially when using a scatter angle of 135°, you may notice that the optical density starts to flatten, and even decrease, when you know the culture should still be growing. This is not a property of the culture, but occurs because the culture is getting too dense, and light is now being interrupted before it reaches the photodiodes. Prior to this point, called the saturation point, the relationship between culture density and optical density is nearly linear. But after this point, there is a flattening, even negative, relationship between culture density and optical density. For all analysis, we recommend only studying when the culture is in the linear regime. You can mitigate the problem by choosing a smaller scatter angle (like 90° or 45°), diluting the culture using an automation like the turbidostat, or using a lower concentration of nutrient(s) in the media. Read more about Pioreactor's optical system here.
What does the effect of the scatter angle have on optical density?
The scatter angle is the angle between the IR LED and a photodiode. This angle can be 45°, 90°, or 135° (although 180° is possible, we don't consider it here). What is there to consider when choosing an angle. In general, the trend is shorter angles => less sensitive at low densities, but higher saturation point. By default, we suggest 45° as a good trade off between sensitivity and saturation. You can mix angles, and the Pioreactor's internal algorithm will still combine them into a single growth rate. Read more about Pioreactor's optical system here.
Can I use my own 5mm LEDs and photodiodes for optical density?
Of course! The only two requirements are that the spectrum of the LED overlaps with the spectrum of the photodiode, and that the LED light won't be absorbed by media/culture, nor damage the media/culture. Thus, the often-used 600nm light source works in the Pioreactor. None of our internal algorithms or analytics are dependent on the wavelength of light chosen.
When you are using additional LEDs outside of the optical density LED & photodiode pair, you may worry that your additional LEDs will interfere with the optical density measurement. This won't happen, as we turn off all non-optical density LEDs before taking an optical density measurement.
Is optical density the same as turbidity?
Turbidity is a measure of optical density, like how decibels are a measurement of sound intensity. Similarly, absorbance is a measure of optical density.
Heating and Temperature control
Why does the Pioreactor only provide a temperature reading every few minutes?
We made a design choice early on to make preparation as error-free as possible. This involved thinking about sensors being in situ (in place), versus the sensors being on the outside of the vial. The temperature sensor in the Pioreactor is outside the vial, which means less chance of contamination, but there's a tradeoff (as you could guess): we have to rely on an estimation algorithm that requires a gew minutes to gather data on. We think this is a fair trade-off, as high frequency temperature readings are not that important in an experiment that lasts 12 hours or more.
Why does the Pioreactor's heating keep shutting off?
If you find that the Pioreactor's heating is shutting off, typically with an accompanying error and flashing blue light, then likely the temperature is becoming too high for safe handling. We restrict the onboard PCB's temperature to be no higher than 63℃. Temperature's higher than this can deform the plastic, and possibly cause burns. If the Pioreactor detects a temperature near or above this value, the software will shut off the heating, and possible the entire Raspberry Pi in extreme cases.
To avoid this occurring, we suggest not setting the target temperature too high - not more than 20℃ above ambient temperature. Also, reducing the Kd parameter in [temperature_automation.stable] section in the config.ini would help.
How does heating work on the Pioreactor?
The Pioreactor has an onboard PCB, called the heating PCB, that sits below the glass vial. On the PCB are resistors that convert current from PWM outputs into heat. By varying the duty cycle of the PWM, we vary the amount of energy converted to heat.
Mixing and stirring in the Pioreactor
How is mixing / stirring performed in the Pioreactor?
Stirring is performed with a micro stir bar inside the vial, controlled by a pair of magnets spinning below the vial. The rotation speed, RPM, of the stir bar can be controlled using the Pioreactor software. This stirring is also how aeration is done.
Can I use my own stir bar?
Of course! The maximum length of a stir bar is 20mm. Keep the height low as to not interfere with the optics. (The provided stir bar is 3mm high). Try using other stir bar shapes / designs!
Why does the stir bar stop or wobble when OD dodging changes RPM?
This is usually a calibration or seating issue. Make sure a stirring calibration is active (re-run it after software updates or hardware changes) and confirm the vial is fully seated on the heating pad. Even a small gap, for example from an o-ring or debris, can make the bar lose sync during RPM transitions.
The magnets rub against the plastic screws above them, causing the stirring performance to be degraded / stop. How do I fix this?
Detach the top faceplate. Under the faceplate, slightly unscrew each of the four metal screws. This will add more space between the magnets and the plastic screws.
How can I increase the strength of the magnetic force applied to the stirbar?
For Pioreactor 20ml v1.0: Try to reduce the distance between the stirring magnets and the stir bar by carefully raising the stirring fan a small amount. Going even further, you can remove the 4mm screws in the bottom of the vial holder (but find another way to secure the PCB), thereby be able to bring the magnets even closer.
How can I improve mixing and aeration?
If the standard mixing and aeration with the stir bar is not enough for your application, you can do a few things, (in increasing order of complication, not necessarily effectiveness):
- If the tubes in the cap are submerged during operation, this is reduce the transfer of air. Pull them up from the top of the cap to keep them out of the liquid. Even more effective: shorten them with scissors.
- Increase the RPM of the stirring. This will increase the surface area exposed to the air. Be warned though: too high of an RPM will cause either a large enough vortex to interfere with the optical systems, or will causing the stir bar to fall out of sync.
- Add a baffle to the vial cap. A simple cylinder that rests into the liquid causes disturbance in the rotating liquid that both mixing and aeration are significantly improved. A tube can be removed from the cap, and a autoclavable rod can be inserted such that it enters the media, but won't interfere with the optics.
- Adding external aeration to your Pioreactor. In the simplest case, using an air pump.
Can I plot the RPM in a chart in the UI?
Yes, follow the instructions here.
Raspberry Pi Hardware
What Raspberry Pi hardware can I use? I see Raspberry Pi 1, 2, 3, 4, 5, A, B, +, Zero - it's confusing!
We've designed the hardware and software to be compatible with most Raspberry Pis that have an onboard Wifi and a 40 pin header. That includes (at the time of writing):
- Raspberry Pi 3 Model B+
- Raspberry Pi 3 Model A+
- Raspberry Pi 4 Model B ² ³
- Raspberry Pi 5 ² ³
- Raspberry Pi Zero 2 (with headers)
Although you can use any above, we like the Raspberry Pi 3 B+, Raspberry Pi 4 B 1GB, and Raspberry Pi Zero 2. All have the necessary CPU power and memory for the Pioreactor workload, and are generally easy to source. Talk to your team about if you need to use ethernet or wifi. If you need ethernet, we like the model RPi 3 B+ or 4 B, or purchase some microUSB-to-ethernet dongles for the RPi Zero 2.
² You don't need a lot of RAM for the Pioreactor, so we recommend getting the lower RAM RPi if offered a choice. 2GB is fine, even 1GB is fine! Also, if you are going to buy a Raspberry Pi 4, you should consider just upgrading for the Raspberry Pi 5 1GB (it's only a few dollars more, and much more performant).
³ These have a USB-C power connector, whereas the other Pis have a microUSB power connector.
What microSD cards do you recommend?
The Raspberry Pi has an official Raspberry Pi microSD card that we recommend for its high quality. You can likely purchase it at the same place you purchase PSUs and Pis. The 32 GB, blank, version is fine.
In general: at least 16GB. We like 16GB or 32GB SanDisk Edge or Samsung microSD cards for their longevity, but any good quality, class 10 microSD card will do.
Note that the official Raspberry Pi microSD card (32 GB) is now included in all Pioreactor + Raspberry Pi orders!
Raspberry Pi Imager fails while writing the image. What should I do?
First, in Raspberry Pi Imager, choose Erase and format the card as FAT32, then try writing again. If writing still fails, try a different, reputable class 10 microSD card.
What power supply unit (PSU) do I need?
If you look at the power rating, it should be more than 5 V and more than 2.25 A, or above 12 W. We really like the official Raspberry Pi PSUs, available at most places you can purchase Raspberry Pis, Amazon, etc.
If you need to power multiple Pioreactors, you might consider a single PSU with USB ports detailed here.
Do I need any cooling for the Raspberry Pi?
Nope, you shouldn't. However, extra heat sinks are never a bad idea!
Could a Raspberry Pi-compatible board work, like Rock Pi 4?
Maybe? We haven't tested them, but so long as i) the GPIO pins are identical, and ii) Raspberry Pi OS can be installed, it should work.
What is the username/password for the Raspberry Pi?
When setting up your Raspberry Pi with the Pioreactor software, you would have chosen a password. Try the recommended username: pioreactor, and password: raspberry.
Can I use the desktop interface (with a display) with the Pioreactor?
Not currently. Our software is based of the "headless" operating-system, which doesn't have display output.
Dosing
Why does the Media card in the UI not update when I run a dosing command?
The Media card will only update when an Dosing Automation is active (even the Silent automation). Why is it done this way? Often, you don't want volumes to be recorded there: during cleaning, during testing, etc. Often you only want volumes associated with the experiment to be there.
All dosing events ares recorded to the database however, and with a record of when the event occurred, and source of action. This data is available in the "Export data" web page, under Dosing event log.
Data storage, access and recovery
💡 For any important project, we suggest manually exporting or backing up critical data multiple different places. This doesn't just apply to using the Pioreactor, but is good advice in general.
Where are logs stored?
For the logs that you see in the Log Table in the Experiment Overview page, these can be download on the Download experiment data page in the Pioreactor web interface. Other logs are also available, including dosing event and algorithm change-logs.
More granular logs per Pioreactor are available in /var/log/pioreactor.log on the Raspberry Pis.
How do I access raw experiment data?
- The Export data page in the Pioreactor UI provides CSV exports of common datasets from a pre-selected experiment.
- All data eventually lands in a SQLite3 database on the leader Pioreactor, by default located in
/home/pioreactor/.pioreactor/storage/pioreactor.sqlite. This can be download using a tool likescp. - To access the SQLite3 database from the command line, try
pio db.
In Chrome, I often see a "Unsecure download" warning. Is that okay?
Yes, since the Pioreactor UI uses the simpler http (not not https), Chrome shows a warning about downloading the datasets. You can click through and continue the download.
To remove this warning, you can click on the "Not Secure" button in the URL bar, click "Site settings", and set "Insecure content" to "Allow".
My leader Pioreactor says the disk is full. How can I clear some space?
If the leader's disk is full, first make enough room for the system to behave normally again, then delete older experiments you no longer need. The commands below clear package caches, old logs, temporary export files, and compact SQLite write-ahead-log data.
Run this on the leader:
df -h /
df -ih /

# Stops active Pioreactor jobs. Skip this if preserving a running experiment matters.
pios kill --all-jobs -y || true

# Frees tmpfs/RAM on current images; useful if the machine is unstable.
sudo rm -f /run/pioreactor/exports/*.zip /run/pioreactor/exports/*.csv /run/pioreactor/exports/*.tmp

sudo apt clean
sudo journalctl --vacuum-size=200M
sudo truncate -s 0 /var/log/pioreactor.log
sudo rm -rf /var/lib/apt/lists/*
sudo find /var/log -type f \( -name "*.gz" -o -name "*.xz" -o -name "*.zip" -o -name "*.1" -o -name "*.old" \) -delete

sudo -u pioreactor sqlite3 /home/pioreactor/.pioreactor/storage/pioreactor.sqlite 'PRAGMA wal_checkpoint(TRUNCATE);' || true

df -h /
df -ih /
The first df commands show whether the problem is storage space (df -h /) or inode exhaustion (df -ih /). After the cleanup, open the UI and remove older experiments from the Experiments page if you still need more space.
My microSD card is corrupted - what can I do?
Unfortunately, the microSD card becoming corrupted or damaged is an infrequent but possible risk with using Raspberry Pis.
-
If the microSD card was inside a non-leader Pioreactor, it's best to try to reformat the microSD card and start fresh (i.e. reinstall the Pioreactor software and reintroduce it to the cluster). This is usually okay as no critical data is stored locally in workers, only log files and hardware calibrations will be lost.
-
If the microSD was inside the leader Raspberry Pi, this is a bigger problem. Likely any running experiment will have to be restarted. Fortunately, if you have more than one Pioreactor in your cluster, then the leader's SQLite database has been periodically backing itself up to other Pioreactors in the cluster every few days. Using the command line, check other Pioreactors'
/home/pioreactor/.pioreactor/storagedirectory for the latest backup namedpioreactor.sqlite.backup(should be from within the past few days hours). You can use this database to restart a new leader.
Networking
How do I change/edit the network the Pioreactor on?
See documentation on networking here.
Can I use Ethernet cable connections instead of Wifi connections?
Yes, so long as the Raspberry Pi's are connected to the same network and discoverable, this should work. Even mixing Ethernet and Wifi is fine. You can read more about networking Pioreactors here.
How can I determine the Pioreactor's IP address? Or the MAC address?
Depending on your access to the Pioreactor, there are a few ways:
- In the UI's Inventory page.
- After SSHing in, use
hostname -I. - If you can't access the Pioreactor's UI or SSH in: the software will write the IP address to the
/bootdirectory on the SD card. After the Pioreactor's blue LED has blinked, you can unplug the Pioreactor, remove the SD card, and place the SD card in another computer. Navigate to the card, and in the directory you should see a file calledip. Open this file, and the IP address should be there. Place the SD card back into the Pioreactor and plug it back in.
I'm using a local access point, but I'd like to install plugins, update software, etc.
To install a plugin
On a computer that is connected to the internet, download the .whl file from the plugins webpage on PyPI. Then, connect that computer to your Pioreactor's local access point's network. To each Pioreactor you wish to install the plugin on, transfer the .whl file to the Pioreactor (using SFTP or FTP). Then, run pio plugins install <plugin-name> --source <path/to/local/.whl>
To upgrade the Pioreactor software
See steps here.
If I have multiple Pioreactor leaders on my network, what leader does http://pioreactor.local point to?
If there are multiple leaders on the same network, then each will override the other's pioreactor.local alias, and the alias will be unreliable. You can either access the leaders by their hostnames: http://<leader hostname>.local, or you can change the alias in the config.ini, too, by editing domain_alias under section [ui] (changing this requires a restart of the machine).