Local access points
For some use cases, you may want to create a local WiFi network just for your Pioreactors (this is called a local access point, or a hotspot). Why might you want to do this?
- If you want to get started right away, without dealing with exiting WiFi networks.
- If your usual WiFi network is restrictive (ex: doesn't allow Raspberry Pis, or requires IT support to host them).
- If you want to take the Pioreactor, or cluster of Pioreactors, out into the field where there is no network.
The Pioreactor comes with the ability to create its own local access point, which other Pioreactors can connect to. See image below:
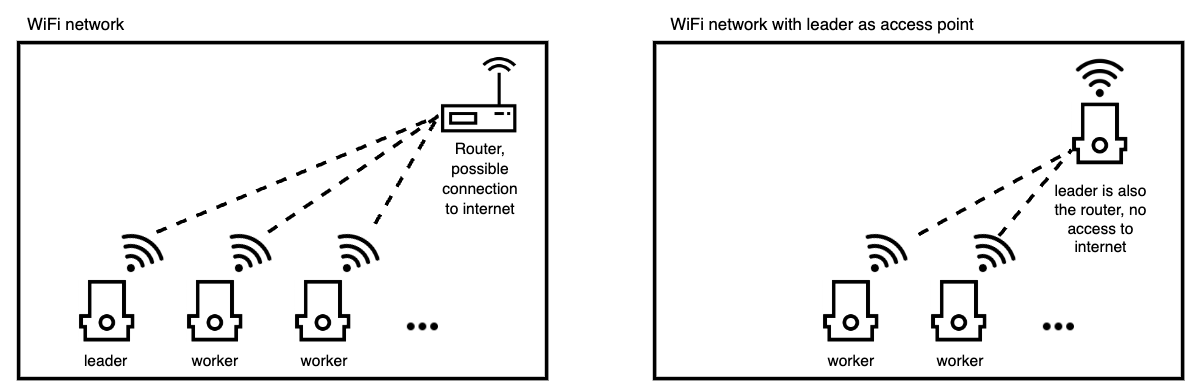
The built-in local access point is meant for small clusters of Pioreactors, and it's range and stability is limited. If you want a proper local access point, we suggest purchasing an inexpensive Wifi router and using that, or a Wifi USB device (the router does not need to be connected to the internet - it will still create a wireless network you can connect Pioreactors to regardless).
Starting a local access point
The Pioreactor has the necessary software and hardware to create the local access point. To start the access point:
- If starting with a new Pioreactor, during software set up:
- In Raspberry Pi Imager, leave Wi-Fi configuration disabled. Continue with the instructions at Setting up your Raspberry Pi.
- After the SD card has been written to, remove the SD card from your computer, and immediately insert it back in. A
boot(orbootfs) device should be present now that is your SD card. If asked to reformat the SD card, select NO. -
Select your country: and download the specific
local_acccess_pointfile: - Drag/move the downloaded
local_access_pointfile to the SD card directory. - Eject the SD card safely, and continue with instructions at Setting up your Raspberry Pi.
- If starting from an existing Pioreactor:
- with the power off remove the SD card from the Pioreactor and insert it into a computer.
-
Select your country: and download the specific
local_acccess_pointfile: - Drag/move the downloaded
local_access_pointfile to your SD card (calledbootorbootfs). - Eject the SD card safely, and put back into the Pioreactor.
Access the local access point
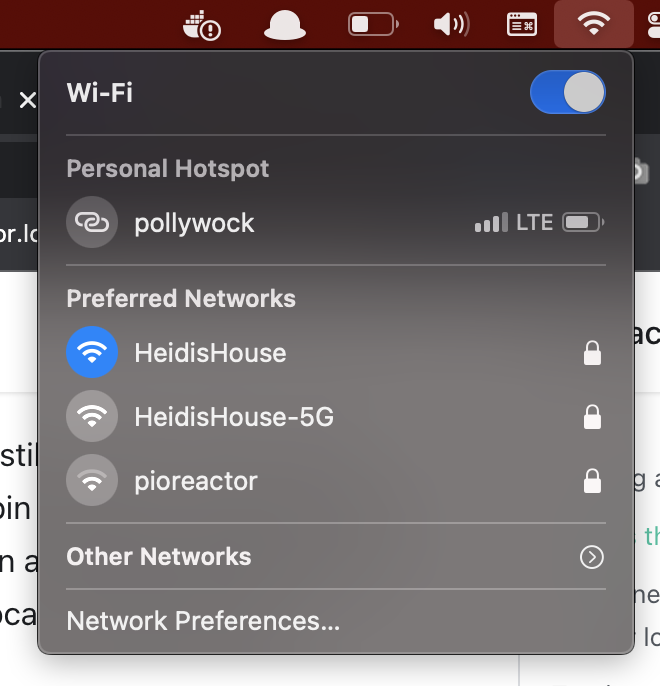
After plugging in the Pioreactor, the local access point will start and you should see a new network called pioreactor, with password raspberry. You should be able to connect to this new access point with any computer, phone, tablet, etc.
Once connected, the usual urls should work: http://pioreactor.local will bring up the Pioreactor interface (having trouble? Not working? Try our troubleshooting steps below.
Without access to the internet, the Pioreactor will have the wrong internal time. You can change this using this method
Connecting more Pioreactors to your local access point
Raspberry Pi 3B (not B+) and Raspberry Pi Zero W (not Zero 2) have trouble connecting to these local access points. Follow instructions here.
Other Pioreactors will need to be reconfigured to connect to this new access point. During setup in Raspberry Pi Imager, use the SSID / Wi-Fi credentials pioreactor and password raspberry in the Wi-Fi settings. Don't add the local_access_point file to these other Pioreactors - you only need to do that once.
The maximum number of machines (Pioreactors and computers) that can be connected to a local access point on a Pioreactor is ~4-8. There is a possibility to add more, see issue here.
This network may not be connected to the internet, so you won't be able to upgrade any software on the Pioreactors. See section below on how to add internet.
Adding internet access to your local access point
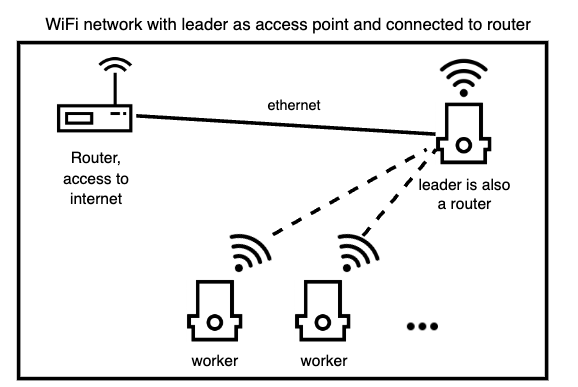
If you are hosting the local access point on a Raspberry Pi that has an ethernet port (B models, or via a usb-ethernet gadget), you can plug this into a router that has access to the internet to provide internet to your entire cluster.
Turning off a local access point
After SSH-ing into your Pioreactor, simply delete the local_access_point file in the /boot/firmware/ directory, and reboot.
sudo rm /boot/firmware/local_access_point
Changing SSID name or password for your local access point
In the config.ini, the SSID and password are editable under the section local_access_point. This requires a power-cycle to take effect, and any other workers in the cluster will need to be updated.
Troubleshooting
My computer can't connect to the local-access-point
Do you see the pioreactor network in the list of available wifi networks?
- If presented, use the option "Use security key to connect" (this is an alias for the password).
- Try power-cycling your Pioreactor
- The maximum number of machines (Pioreactors and computers) that can be connected to a local access point on a Pioreactor is ~4-8. There is a possibility to add more, see issue here.
Alternatively, do you not see the pioreactor network in the list of available wifi networks?
- Try power-cycling the Raspberry Pi
- If you unplug the Pioreactor, and place the SD card back into your computer, do you see the
local_access_pointfile? If not, try adding the file again, inserting the SD card in the Pioreactor, and restarting the Pioreactor.
I'm on the network, but can't load the Pioreactor UI at http://pioreactor.local
Try http://<your_leaders_hostname>.local. Still not working? Try http://10.42.0.1)
I can't connect a worker to my local access point
- confirm that you are using the right wifi name and password in the Imager (default
pioreactorandraspberry), and the hostname is correct and unique. - The maximum number of access point clients (Pioreactors and computers) that can be connected to a local access point on a Pioreactor is ~4-8. See question below.
I'm pretty sure I'm at the limit of ~4-8 clients on my access point - what can I do?
- You can purchase an inexpensive wifi router and use that as the access point. Note that you don't need to connect this router to the internet - it will operate a wireless network regardless.
- You can purchase a Wifi USB stick to improve the number clients and range of your local-access-point. For example, the Alfa AWUS036AC (take note to confirm your Raspberry Pi can has the correct USB connection). To check if the device is active, use
nmcli deviceand look for awlan1(which represents the USB stick). To move the local access point to this USB stick, usesudo nmcli connection modify PioreactorAP ifname wlan1 - Another possible option is purely software based: There is a possibility to add more, see issue here.