Yeast growth in ethanol
Explore the ethanol fermentation process and practice dilution calculations for media preparation.
Requirements
- At least two available Pioreactors
- Dry baker's yeast
- Ethanol (95% rubbing alcohol)
- Distilled water
Introduction
To get their energy, yeast species are fermentors; they take sugars and oxygen and metabolize them into ethanol and carbon dioxide. We've used these products to create many goods in the food industry, such as breads and beers!
While we have found many applications for yeast products, yeasts themselves see these as waste products. These waste products can accumulate, leading to what's called the "staling effect" where yeasts can't grow because of an over-accumulation of their own waste.
We know that most yeasts can tolerate an alcohol concentration of 10-15% before dying. Now, let's choose some alcohol concentrations and explore this inhibition using our Pioreactor!
We've included two methods to calculate ethanol percentages; teachers can prepare this beforehand or allow their students to calculate it themselves.
Experiment
We conducted an experiment using 4 Pioreactors and vials with ethanol concentrations of 0%, 4%, and 6%. After adding 15 mL YPD stock into each vial, we calculated the amount of ethanol to use per vial using Method 1 below. Method 2 can be done instead to simplify the procedure.
Method 1
The first concentration of 0% ethanol is easy — we just add 1 mL of distilled water. For the rest, the following calculations were done to determine the volume of ethanol to add to each vial:
In our case, we have 15 mL of YPD broth per vial, and want to add 1 mL of diluted ethanol; we want to determine our final concentration of ethanol in 1 mL to get an overall 2% concentration in our complete, 16 mL of media.
For 2%:
Now, we know we want our 1 mL of dilute ethanol concentration to equal 32%. Since we're starting with an initial concentration of 95%, we can apply the following dilution equation to figure out the concentration of 95% ethanol to use:
Initial volume (Vi)= ?
Initial concentration (Ci)= 95%
Final volume (Vf)= 1 mL
Final concentration (Cf)= 32%
Now we substitute our variables into the equation Ci Vi = Cf Vf:
So the composition to create 2% ethanol media is:
- 15 mL YPD stock
- 0.34 mL of 95% ethanol
- 0.66 mL distilled water (1 mL - 0.34 mL)
If you don't have a small enough resolution on your measuring tools, you can increase the total amount of ethanol dilution. For example, instead of making 1 mL diluted ethanol, we used 3.4 mL of 95% ethanol and 6.6 mL of distilled water measured in a graduated cylinder to create a total 10 mL diluted ethanol. From that, we mixed well and added 1 mL into our vial.
We repeated this for 4% and 6% ethanol concentrations.
Method 2
Instead of finding the exact ethanol amounts to add to create a specific ethanol percentage, we can keep halving the ethanol solution and calculate the ethanol percentage afterwards. For example:
Vial 1: 1 mL of 95% ethanol
Vial 2: 0.5 mL of 95% ethanol; 0.5 mL distilled water
Vial 3: 0.25 mL of 95% ethanol; 0.75 mL distilled water
Vial 4: 1 mL distilled water
To calculate the resulting ethanol percentage:
Substitute the [ethanol] value for half of 95% (or 47.5%):
This technique produces halving ethanol percentages of 0%, 1.5%, 3%, and 6% to be studied on a cluster of 4 Pioreactors.
Results
After approximately 18 hours, the following implied growth rates were recorded:
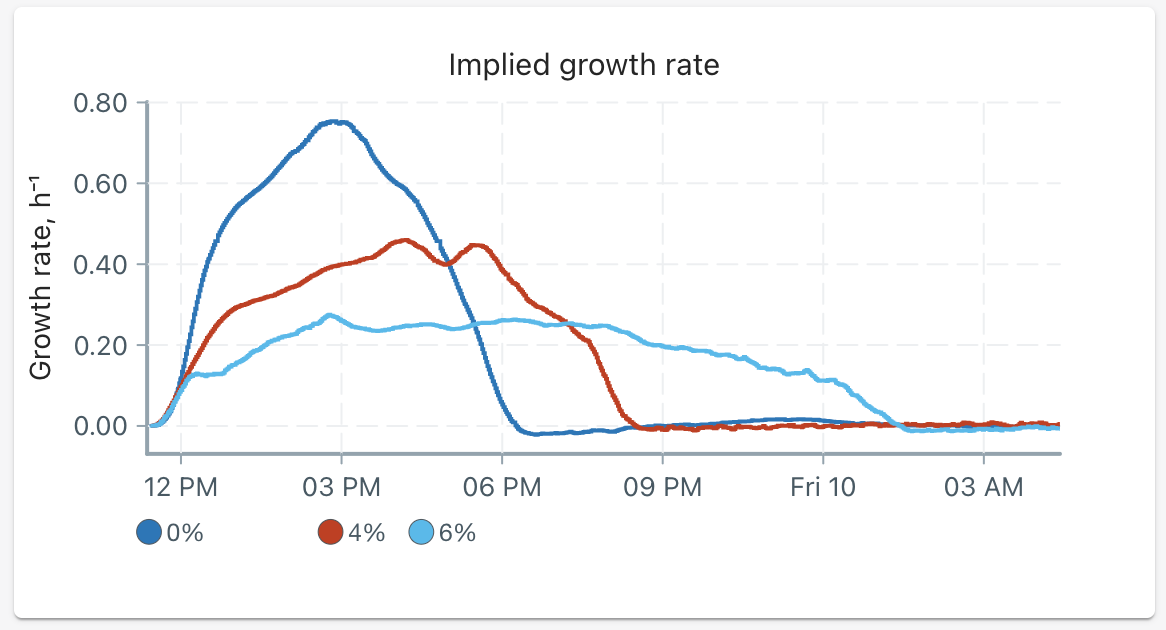
We can summarize our results in the following table:
| Alcohol percent | Peak growth rate (h⁻¹) | Percent of control | Time to reach stationary phase |
|---|---|---|---|
| 0% | 0.75 | 100% | 7 hours |
| 4% | 0.46 | 61% | 9 hours |
| 6% | 0.27 | 36% | 14 hours |
As expected, just the smallest addition of ethanol really cut down on our yeasts' ability to grow. At a 4% alcohol concentration, the maximum growth rate decreased by almost 40%!
Recommendations
We encourage you to select alcohol concentrations outside of the expected range. At what point does yeast show no growth? Can you see anything interesting when your culture reaches the stationary phase? Hint: you may be able to observe a diauxic shift!
Plenty of yeast strains are available at your local breweries. You can do the same experiment on different strains to see which yeasts are more tolerant than others. What concentrations of beers can they make?
Detailed procedure
- Prepare a sterile stock of 50g YPD / 1L distilled water. Aim to make 20 mL × the number of Pioreactors you are using, as each Pioreactor will require about 15 mL of media.
- Prepare 1 mL of each ethanol concentration you would like to use.
- Detailed calculations are found in the example above. Aim for an end ethanol concentration between 0-10%.
- Evenly divide the YPD stock into the vials you’d like to use (ie. 15 mL in each vial).
- Add the millilitre of ethanol solution into the respective vial. Mix with gentle shaking.
- Inoculate the stock with a very small amount of baker's yeast using best practices to avoid other contamination. Wait for the yeast granules to dissolve, aided by gentle rocking or stirring.
- Alternatively, a yeast stock solution can be made by diluting a small amount of yeast in 15 mL of YPD stock, then 1 drop of this stock solution can be added to your vials.
- Wipe the vials and place them in the Pioreactors.
- Visit pioreactor.local and start a new experiment.
- On the left menu, select the Pioreactors page. Add any additional Pioreactors that you would like to use (more information here). Select Control all Pioreactors, and start Stirring activity and OD reading activity.
- Optional: you can turn on the Temperature automation activity and set it on Thermostat at an optimal temperature (ex. 30C).
- Confirm that everything looks normal (ex: receiving optical density signal).
- Back on the Pioreactors page, select Control all Pioreactors and start Growth rate. It will take a minute for results to begin showing up.
- Optional: you can change the names of the Pioreactor in the UI to display the target temperature.
- Students can watch growth progress on the Overview page.
References
Alba-Lois, L., & Segal-Kischinevzky, C. (2010). Yeast fermentation and the making of beer and wine. Nature Education, 3(9), 17.
Gray, W. D. (1941). Studies on the alcohol tolerance of yeasts. Journal of Bacteriology, 42(5), 561-574.